Saturday, November 10, 2012

Holly Jolly Blog Hop

 bloghopbutton200x200
Hi and welcome to the Holly Jolly Blog Hop. This hop will showcase projects from many wonderful crafters just in time for you to get lots of crafty holiday inspiration!
If you just happened by my blog today and would like to start the hop from the beginning, please go to Fantabulously Pink.   If you're following the hop, then you should have arrived here from Macy Bella Designs. I'll include a complete list of hoppers at the end of my post.

For today's project I made ornaments using large, clear plastic ornaments from Hobby Lobby and clear acetate. (I used transparency sheets from Office Depot). To start, I cut the transparency using  the ornament image from the Joys of the Season cartridge. This piece should be just slightly smaller than the diameter of the ornament.

  The next step is to select the image. Try to find some that aren't too intricate and will cut well in small sizes. I cut most of mine around 2". Also, you don't want a lot of layers because they will be too thick and make it difficult to roll up your acetate to place in the ornament. When your image is ready, glue it to the acetate piece, not too close to the top. Let your adhesive dry, then roll the whole thing up and place it in the ornament. 
This is where a good pair of tweezers comes in handy! After you release the piece in the ornament, it will be a little curled, so use the tweezers to straighten it up and place it where you want it. Since my acetate was a bit short, I placed two glue dots in the ornament, just to the side of the stem. I used the seam in the ornament as a guide for placement. This was honestly the trickiest part of putting these together. It helps if you have glue dots that are a little thick. I used Dap StikArounds that I found at a hardware store. You can see the glue dot just to the left of the stem here.

Once you are happy with the placement of your image, it's time to add the snow. I used Martha Stewart Snow Glitter. To finish off the ornament, I added a bow and some greenery made with the MS Pine Punch.
I apologize for the pictures. It was difficult to get any without the glare of the light on them!

Thanks for joining us on the hop today and I hope you enjoyed my project. Your next stop is the talented Ken at Ken's Creations.


Images from  Sweater Weather, Winter Frolic.


Kreimers http://fantabulouslypink.blogspot.com/
 Tiffysmom http://angiespaperpassion.blogspot.com/
BetsyBoo http://www.betsymcreates.blogspot.com/
October Beauty http://www.macybella.blogspot.com/Macy Bella Designs
Maria  http://stampcutcreate.blogspot.com/
Ken’s Kreations www.kreativeken.blogspot.com
DarcyBeeler http://dlmbscrapping-time2create.blogspot.com/
Scrapalette http://scrapalette.blogspot.com/
Momtotwocuties http://www.inlovewithpaper.blogspot.com/
Greengirl www.michelegreen.com
Scrappin-Nanapuddin http://scrappin-nanapuddin.blogspot.com
CraftyScentiments http://craftyscentiments.blogspot.com/
CricutAddicted http://scrappingformorefun.blogspot.com/
Sis O’Snap http://papercraftscissors.com/
TerriSki http://scrappinwiththebug.blogspot.com/
Phantom Rink Rat http://addictedtothecricut.blogspot.com
TheCraftyTouch www.thecraftytouch.blogspot.com
HappyScrapper64 http://happyscrapper64.blogspot.com/
CraftySanSan http://1craftysansan.blogspot.com
MamaC http://cccscraproom.blogspot.com/
NadiaH-McConnell http://www.withglitteringeyes.com/

Monday, November 5, 2012

Cricut Suburbia Birthday Card

Hi Everyone! Today I'm sharing a card I made using the new Suburbia cartridge. I love the simple silhouette designs and art style of this cartridge. I already had the sentiment, from Art Impressions, and found this image on Suburbia that I thought worked perfectly with it. The images on the cartridge are basically two layers, one black outer layer and one that is done in color for a little contrast. I made a few modifications, cutting the top layer twice so that the dress would be a print, rather than just the black.
 These are the three cuts I made. The bottom layer in white glitter (though you can't tell from the picture!), then the top, or shift, layer in a print and the black.

 I cut the pieces I didn't need off the print layer, leaving only the dress portion.

Here is the image with all the layers put together. There is a tiny hole in the head that I assumed was supposed to be an earring. A small drop of  Pearl Pen worked to make it stand out.

A close up of the stamped sentiment, heat embossed in brown. The small ric-rac was a piece that just happened to be on my desk. I thought it worked well!
Here is the final product and I was really happy with the result! The background papers are from DCWV's Linen Closet collection. The floral print reminded me of vintage wallpaper. The chair is from Love You a Latte and the paper is from the same DCWV stack. Her dress is My Mind's Eye Stella Rose, Gertie collection. I also added some small adhesive pearls, because what lady would be caught without her pearls on, right?
This was a fun card for me, made for a special friend, and I was so glad that it came out pretty much as I imagined it!
Thanks for stopping by!

Wednesday, October 31, 2012

Witches Hat Treat Box

Well, Halloween is officially over and I'm just now getting around to posting one of the things I made this year. I have been busy with a couple of different swaps I joined and two of  them didn't have much to do with paper. I'll post pics from those as soon as I'm able. For now, here are the boxes:
 These were made with the Cameo and the file is from the Silhouette store. These were super easy, and i was able to make them in about an hour from start to finish.
 
 I'm participating in a use your stash challenge and am happy to say that everything I used was stuff I already had. The paper is DCWV, the flowers, bling and brads from Recollections. I actually had those flowers in a bag of things I was going to get rid of. They ended up being perfect for this project!
Here's the box with the top off. It actually held a good amount of small candy bars.
Hope everyone had a fun and safe Halloween. We had so much fun trick or treating with the grand kids, but boy did we enjoy the quiet when everyone went home!
Thanks for stopping by!

Tuesday, October 16, 2012

Halloween Pails Re-post

I originally posted this last year, but thought it was worth repeating! Unfortunately I haven't seen these pails at Michaels recently. I hope they bring them back.

A few weeks ago I found these cute plastic pails for $1 at Michaels. I thought they'd make perfect Halloween treat buckets so I grabbed a few to decorate for the grand kids. I love how they turned out.

 I used Oracal vinyl, and even though this was only my second time to use it, it was much easier than I expected it to be. I added some bling to the purple one and cute buttons to the others. Here's a list of the carts used:
Hello Kitty Font
Mini Monsters
Martha Stewart Seasonal Cake Art
Paper Doll Dress Up
Sesame Street Font
Pumpkin Carvings
Simply Charmed
Boys Will Be Boys (The spider's mouth is two worms welded together)
This was such a fun project, I want to make more! I'll have to think of some more kiddos I can make some for!
Thanks for stopping by!

Sunday, October 14, 2012

Halloween Card-Rattle Your Bones

Hi everyone! This was my post for October on the Cricut Fanatics Blog.
 I hope you are having a great Friday! For today's project I'm sharing a cute Halloween card I made for my grandson. He loves everything I create for him with the Cricut, and he especially enjoys making things with me. He calls my craft room my Making room! Anyway, on to the card.
I started with a piece of white card stock cut 5 1/4" by 4" then covered it diagonally with coordinating strips of washi tape. I left the pieces long then folded the ends over the edges of the card stock for a clean, finished look.
 I then mounted this on a piece of black 5 1/2" by 4 1/4" card stock. The green mat is from Elegant Edges and is cut at 3.75" from a scrap of Bo Bunny paper. The edges were inked with Walnut Stain Distress ink by Ranger. It was adhered to the card with liquid glue. The phrase is from the A Frightful Affair cartridge, cut at 2.96" out  of orange glitter paper from DCWV. The original image has a skull on it, but I used the Gypsy's hide contour feature to cut only the words. The little skeleton is from the Trick or Treat cartridge and is cut at 3.70". My little trick for gluing all those small pieces is to pour a little puddle of glue out (I have a small plastic lid that I use for that) then use tweezers to pick up the small piece, dip lightly in the glue, then place on the bigger piece. I finished him off by adding some google eyes. For added fun, I used an Action Wobble to attach the skeleton to the card. It was actually a little too big but I was able to trim off some of the edges so it wouldn't be seen from the front.
Here's my attempt at a shot of the Action Wobble in motion! Once the card was complete I realized that I almost completely covered the washi tape background. Oh well, I still like the look of it!
That's my project for this month, hope you enjoy it! Have a great weekend, and as always, thanks for stopping by!
Maria

Friday, October 12, 2012

Falling for Halloween Blog Hop Winners!

Thank you to everyone for hopping along with us last weekend!  I can't tell you how much I appreciate all of you for visiting  the blogs, not just one day but two, and for all the kind comments that you left! A huge thanks too to all the participants for making the hop such a success!
Now on to the good stuff! The winner of the Chic and Scary cartridge is Lisa B.! The winner of the Halloween pack is marg0006! Congrats to you both and I will be contacting you for mailing info.
Have a great weekend!

Sunday, October 7, 2012

Falling for Halloween Blog Hop, Day 2

Welcome to the second day of  hop! I am the host and the first stop on the hop. If  you missed day one you can still check it out by scrolling down to yesterday's post.  If you complete the hop and leave a comment on all the posts, you will be eligible to win a Cricut Chic and Scary cartridge! In addition to that, if you leave a comment on my post you will have a chance to win an Anna Griffin Halloween set. You can check out both prizes by scrolling down.
For today's project I decorated two plastic charger plates with vinyl. These plates are from Michael's and and come in a variety of colors, which change seasonally. FYI, the plates are for decorative purposes only and are not recommended for food service. Just thought I'd mention that in case anyone was wondering!

 For this one I used the Word Collage cartridge and the Gypsy. I used the hide contour feature to select different words and then cut them out of the color vinyl I wanted them to be. Believe it or not, the most time consuming part of this for me was choosing which words would be which color! The little characters around the edges are from the Paper Trimmings cartridge. To fill in the spaces in between, I added some jewels in Halloween colors.

This plate is obviously a Thanksgiving theme. The phrase is from the Inspired Hearts cartridge, the center flourishes from Cricut Alphabet and the outer leaf flourish from Thanksgiving. I used a dark brown vinyl for the phrase and a light grey for the other cuts. I also added some jewels to this plate to fill in the blank spaces. After adding the larger jewels to the flourishes I couldn't decide if I liked them or not. I guess I'll live with it for a while and see.
I hope you enjoyed today's projects. Next up is the fabulous Michele at  Scrap and Dance  .
Thank you so much for visiting us for this hop. I hope you enjoyed it and found some projects that inspired you. A huge thank you to my fellow hoppers who made this hop a success! You guys are all wonderful!
Until next time...

Saturday, October 6, 2012

Falling for Halloween Blog Hop

Welcome to day one of  The Falling for Halloween Blog Hop!  It's so exciting to be the host of this hop and be joined by several super talented paper crafters. I'm also glad you decided to join in on the fun and I'm sure you will see lots of wonderful projects for Fall and Halloween.
What's a hop without blog candy?  As the host, I will be giving away  a Cricut Chic and Scary Halloween cartridge. To be eligible to win, simply visit all the blogs in the hop and leave a comment on each one.

I have a separate prize that includes Anna Griffin Halloween paper, ribbon, rub-ons and glitter letters and two cute stamps by Recollections. The winner for this prize will be chosen from comments left on just my blog. You can double your chance by commenting on both days of the hop.

Winners will be announced next Friday, October 12th. Be sure to leave a way for me to get in touch with you in your comment!
 Now, on to my project!

For today's post I created a cheerful Fall wall hanging. I started with a piece of blue  Coordinations card stock. To add some subtle texture I stamped some small fall images and heat embossed them with clear embossing powder. The paper was machine stitched around the edges  with a large zig-zag stitch. The tree and leaves are from the Cricut Stretch Your Imagination cartridge. The tree was cut twice, the, each piece was layered with foam tape. Some of the branches were outlined with Cinnamon Stickles.  The leaves were cut in different fall colors with some  cut smaller and placed along the bottom of the page. The cute kissing squirrels are from  Live Simply. They are placed on the page with double layers of pop dots for more dimension. The phrase is from 3 Birds on Parade. Gold adhesive jewels were added to the letters after they were outlined with a brown sharpie.
Hope you enjoyed today's project for the hop! Next up is the talented Michele at  Scrap and Dance  
Remember, if you visit everyone in the hop and leave a comment you will be entered to win the Chic and Scary cartridge! Below is also a list of all the hop participants.
Thanks for stopping by and hope to see you back tomorrow for day two of the hop!

Friday, October 5, 2012

Blog Hop this Weekend!

 Photobucket
Please join me and some of my crafty friends for the Falling for Halloween Blog Hop this weekend, October 6th and 7th. You're sure to see lots of wonderful inspiring projects for fall and Halloween and have a chance to win some blog candy along the way. Hope to see you this weekend!

Thursday, September 13, 2012

Sugar and Spice Shadowbox


If you missed it, yesterday was my first day as a design team member at the Cricut FANatics blog. Just thought I'd go ahead and share my project here too. You can get all the details here. Be sure to check out the other projects, there are one or two new ones every day. Also, you can leave comments for chances to win some great prizes!

Thanks again for stopping by!


Wednesday, September 12, 2012

Cricut Fanatics Design Team Project

Hi everyone! Today is my first day as a design team member for the Cricut Fanatics Blog. Please come on over and check out my project and all the other projects posted by the members of the team!
Thanks!

Tuesday, August 28, 2012

Another Birthday Card

This one is for my son, who's birthday is on Wednesday. He has gotten into rock climbing the past couple of years so I was happy to find this cut in the Silhouette Store.
The actual cut is just the blue part, but I was able to create the shadow by using the offset feature. I created the sentiment tab with the software too, using print and cut.
The striped paper is DCWV from the Autumn Melody stack. The blue and brown paper is Coordinations. On the rock portion of the cut, I sanded the paper a little with a nail file, then lightly inked it with Old Linen Distress Ink. I added some small copper brads to complete it.
Here's the inside, just a little pun. This cut is from the Cricut Cupcake Wrappers cartridge. I'm finding that I am using both my Cameo and Cricut on quite a few projects. I guess it's just nice to have so many options!
Thanks for stopping by!

Friday, August 17, 2012

Stick Pin Swap

Hi everyone. I recently participated in my first stick pin swap with some of the members of the Circle. There were three groups of 20 and we were to make 2 pins per group. I was only in one group, but after seeing some of the lovely pins that were created, I wished I had been in all three! Anyway, here are the pins I made.
Part of the swap was to create a holder to put the pins in. I came up with a matchbook style holder. It was pretty simple, especially compared to what some of the others did.
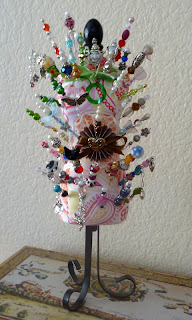
Here are the pins I received in the swap. The dress form pin cushion if from JoAnn's. Isn't it perfect?


They are all beautiful, unique and just fun to look at. This was a fun swap and I'm looking forward to doing more charm and bead type projects. Yup, yet another crafty thing to obsess over!
Thanks for stopping by!

Sunday, August 5, 2012

Happy 50th

My husband celebrated his 50th a few  weeks ago. So far he seems to be taking it well! He has a great sense of humor, a super quick wit, and he will zing anyone if he gets the chance. My cards for him are almost always humorous and if I can get one on him, well I'm going to do it.
 The paper is from Cosmo Cricket, the Joy Ride collection. I used my Cricut to cut the images for this card. The girl is from Forever Young, the word bubble from Create a Critter and the argyle mat from Elegant Edges. I added some faux stitching with a Sew Stamper. The numbers are Thickers Sparkles. The sentiment is computer generated. The inside reads: I know how sensitive old people can be about their age!
He had a wonderful birthday celebration with our girls, their husbands and the grand kids. One of our sons in law cooked an awesome dinner and I made his favorite German chocolate cake. I don't think he really even minded that I teased him about getting old!
Thanks for stopping by!

Wednesday, July 11, 2012

It's Been Awhile (again!)

It's been over a month since I've posted anything, but then, I really haven't been crafting much lately. I guess we all get in our little crafting funks though, don't we? I did just finish a Copic coloring class - see my new badge on the sidebar?- and I will say I was spending some quality time with my markers. I guess I need to do more stamping so I can show off my new skills, ha, ha!
 Anyway, I thought I'd share a couple of cards I made a while back. I used the Close To My Heart Dotty paper pack for these, I really like the bright vibrant colors. The butterfly is a stamp from the CTMH Love Clusters set. It was stamped with Lagoon ink then heat embossed with a Halographic embossing powder.They are adhered to the cards with foam tape.

 On the first card,  small rhinestones were added to the body. Some small butterflies were stamped then heat embossed to the yellow polka dot paper. A yellow satin ribbon was tied around the card, and a button was added with some hemp twine.
 On the next card pearls were used for the butterfly body and a pearl flourish was added to the yellow background. Seam binding, which was dyed light yellow, was tied around this card. Machine stitching was added to both cards, but a smaller, tighter setting was used for the bottom card.
If you're interested in the Copic class, Created by Color is now registering for another basic class that's starting in August. Just go HERE for the info. I highly recommend this class!
Thanks for stopping by!

Friday, June 8, 2012

Altered Box Swap, Part 2

A week or so ago I shared the box I made for this swap. Today I'm sharing the box I received. I have to say, this box more than exceeded any expectations I had! The person who made it for me, RockinRenee, really put a lot of work into it (or she at least made it look like she did!) Anyway, I love it, and here it is:


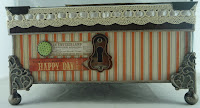
Every inch of this lovely box was decorated, even the bottom! This is the front, side and back. The papers and embellishments are from My Mind's Eye, Lost and Found. Isn't it gorgeous? I really love the feet that she added too.
 This is the top of the box, and yes, that's a real working clock! 
Here's a peek at the inside lid, another dimensional sticker and the clock works...
 And here's the inside view of the bottom part of the box. See, every bit is decorated!
The box itself really would have been enough for me to be happy, but then, it was filled to the brim with goodies. I think it's the entire Lost and Found collection!
Then, for the handmade item, Renee included these tags she cut that coordinate with the stamps.
Can you see why I was so thrilled to receive this box? It's absolutely wonderful and sits on the corner of my work desk so I can see it whenever I'm in my craft room. I also always know what time it is now.
This was a really fun swap and I'm so glad I participated in it. It was so interesting to see how everyone decorated their boxes so differently, and really, everyone did an amazing job! Thank you, Renee, for making mine extra special!
Thanks for stopping by!

NSD 2015 Challenge: Leave You In Stitches

Hi all and welcome to my blog. It's been a long time since I've posted here, but I'll fill you in on that another time.  Today, ...