Warning: this is a long, pic heavy post!
I have some big news; my husband and I are moving. Well, at least we will be as soon as we sell our house. We haven't put it on the market yet though, because we have a few small projects to finish and we also have to de-clutter before we can even think about showing it. This of course means that my craft room will have to get packed up and moved, which is quite a daunting task! The room that currently houses most of my crafty belongings just happens to be the largest of the secondary bedrooms in house, and we will have to clear it out and make it look like a bedroom for showing. To say that I'm not looking forward to doing it would be a huge understatement! I thought maybe if I posted about it and shared some pictures, it would help me get motivated to actually start working on it. So, here goes. I have a lot of stuff and I have never quite been able to organize it the way I wanted. I have started to go through it already and have some stuff set aside to purge.
This is the view into the room from the doorway. My husband made the desk that's in the center by the window. That's his side you're looking at and those are his shelves on the wall. That's pretty much all of the room he takes up! Well, maybe a small spot of the cabinet behind him.
We found this cabinet on the side of the road. We stripped it and painted it and Tim made the top. As you can see, it holds my heat press, Ebosser and guillotine cutter. The drawers have paints and supplies for the Yudu, machine embroidery thread, washi tape and misc. tools. The shelves next to it hold some of my 6 X 6 and 8 X 8 paper pads.
And here are my 12 X 12 stacks, more 6 X 6 and loose papers. The drawers are mostly empty, I'll show you why in a minute. The wire baskets have stamps in them.
This is my big L shaped desk that Tim made for me back when I used to sew a lot. It was perfect for that, but never really has worked out for my paper crafting. I decided that I don't like having the cabinets because I can't see what I have or remember where I put anything. The shelves have more stamps, Stampin up and others that are in Iris photo boxes then stacked in plastic crates. My Cricut and Cameo are on the rolling cart, along with my Cuttlebug, more stamps in photo boxes and my Janome Mini sewing machine. My copic markers and Xyron machines are on a shelf underneath the desk where my chair is.
This is the mess that is my side of the desk! I have a small Clip it Up on the left side that has more stamps. The larger one in the foreground is one we made and it has some of my Nestability dies and embellishments. The black box on the dest was originally made for Quickcutz dies, but it hold my Distress ink pads. The black binders underneath have my embossing folders in them. There are also some Sterlite boxes with embossing powders and flock in them. There are shelves on the left side and I have boxes with adhesives, etc in them. I also have rolls of vinyl and my Copic paper there. That pile in front of the window is some of the stuff I'm getting rid of and some packages of stuff I haven't put away yet. :/
This is the closet. Yikes! More paper, ribbon, beading supplies, Cricut cartridges and handbooks and just a bunch of other junk I thought I'd need for future projects.
And more ribbon!
But that's not the worst of it! I have so much stuff, I couldn't fit it all in one room!
My sewing stuff is in another bedroom across the hall. I do love this cabinet though, I got it from Walmart.com for $99!
Yes, there's stuff in this bedroom closet too. Fabric, yarn, patterns, thread, books and magazines. My embroidery machine is just under that bottom shelf, along with some other things.
This is the corner of the room that I've started piling things to get rid of in. The big plastic drawers have my photo lights and more Yudu supplies in them. I'm happy to say that the smaller plastic drawers are not mine! Haha!
This is the reason some of my drawers are already empty. I invested in the Scraprack system last year to start organizing my embellishments. So far I'm liking it, but this one is already full and I need to get more supplies. I keep it on a rolling cart and right now it's in a niche in the hallway. The second shelf on the cart has my Cricut Solution cartridges in Jukeboxes and the rest is just random stuff that I need to go through.
My plan is to start going through it a section at a time, deciding what I can't live without for the next few months, then packing or purging the rest. I'll be documenting my progress here, if for no other reason than to keep me on task. Wish me luck!
Oh, and I welcome any and all suggestions from those of you have been through this process. I've gotten a few ideas already from some the wonderful ladies on the Cricut message board. I will definitely be implementing a few of them.
Have a wonderful day and if you read all the way to this point, I thank you!
Thursday, January 30, 2014
Sunday, August 25, 2013
You Had Me at Bacon
Bet that title sparked your interest! A few months ago Simon Says Stamp released a stamp set called Sizzle On designed by Kelly Purkey. I don't know why, but I felt the need to own it, and this weekend I actually used it.
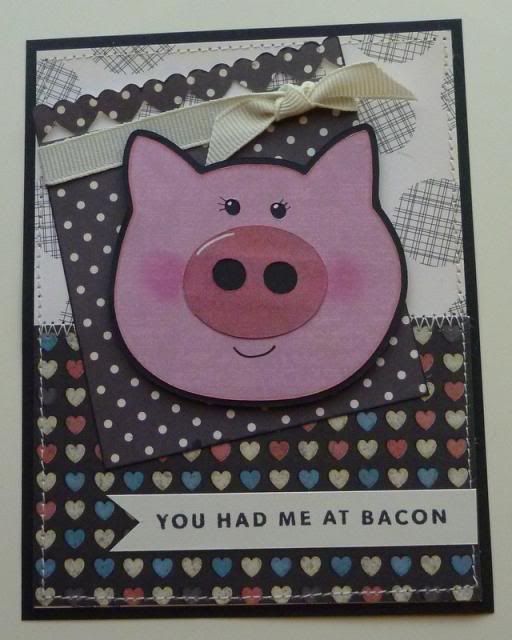
The past week on the Circle board we've been having a "debate" over which image on the new Charmed cartridge is cuter, the pig or the bear. It has turned into a fun contest and challenge. So far, despite some claims to the contrary, I believe the pigs are winning! Here is my contribution:
The printed papers are from October Afternoon and DCWV. The heart border is a Martha Stewart punch. Piggy is from the Charmed cartridge and the stamped sentiment from Simon Says Stamp. If you want to check out the stamp set, you can find it HERE.
Thanks for Stopping by!
The past week on the Circle board we've been having a "debate" over which image on the new Charmed cartridge is cuter, the pig or the bear. It has turned into a fun contest and challenge. So far, despite some claims to the contrary, I believe the pigs are winning! Here is my contribution:
The printed papers are from October Afternoon and DCWV. The heart border is a Martha Stewart punch. Piggy is from the Charmed cartridge and the stamped sentiment from Simon Says Stamp. If you want to check out the stamp set, you can find it HERE.
Thanks for Stopping by!
Saturday, July 27, 2013
Christmas in July Blog Hop - Anything Goes!
Welcome to the Christmas in July Blog Hop, hosted by Scrapalette. This has been a month of hops, with a different theme every Saturday. Today is the fourth and final Saturday of this hop, and the theme is anything goes. If you're following the hop then you should have arrived here from the super talented Sis's blog. If you just happened upon my blog today and would like to start at the beginning, just go to the wonderful Scrapalette's blog. Also, Scrapalette is offering a prize for the hop. . .a Christmas Village cart and a
she'll be doing a drawing from all the entries from all the weeks for a Christmas {Noel}
solutions cart!
For my project today I made an Advent calendar that is also a banner. To do this I needed a small box that could be hung from the garland I use to decorate my mantle. I found the perfect box on the Tags, Bags, Boxes and More 2 cartridge. It's the cone box that is found on page 63 of the handbook. I love the triangular shape of it and it already had the little ring at the top for hanging. I cut 25 of the boxes at 5" using a variety of printed paper from the K & Co. Yuletide paper pad.
This is the cut image before folding. I used 1/4" Scor-tape on the flap to glue it together. The great thing about the TBB&M cartridge is that it makes the score marks for you. Simply cut your image first, hit the load mat button again, change to the Cricut Scoring blade, then use the shift feature of the image you cut. Perfect score marks every time. You can also use your regular blade, just adjust it down to 1 and adjust your pressure setting down. It may take some trial and error to get the right settings though.
I used Mini Monograms for the scallop portion of the number tag. They were cut at 1 1/4". The number part of the tag was made on my Silhouette using their sketch pens. I placed them on the boxes with pop dots. Lastly, I added some small bows to the tops of the boxes.
I think this will be a fun addition to my usual Christmas decor! I'll be sure to post pictures of them in December when the decorating is done. In the mean time, they store flat so I won't have to worry about them taking up a lot of space.
I hope you enjoy my project and that you will continue on the hop with us. The next stop is the fabulous Laura at Cool Beans by LB.
Ooh, I almost forgot, I have candy! For a chance to win this cute My Mind's Eye Winter Wonderland collection, just leave a comment on this post. I'll announce the winner on Th, August 1st!
Thanks for stopping by!
Tuesday, June 25, 2013
Hello Summer!
Hi all! I hope you are all having a wonderful Summer so far. Mine has been good, not too crazy yet. Although I don't have kids at home anymore, I do keep my grand kids, (I have four now, ages 10 months to 5 years!) so they have me pretty busy. Next week we are heading back home to Florida for a week and I am really looking forward to getting away for a bit and to just sitting on the beach!
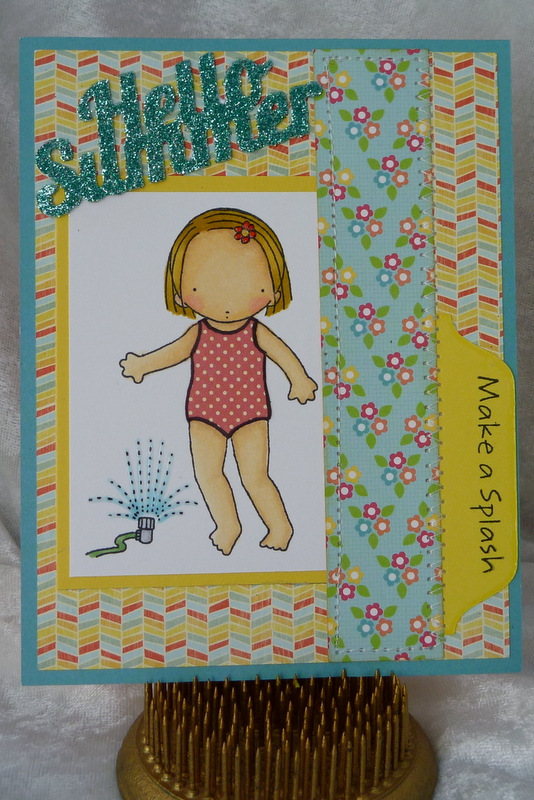
Lately I have rediscovered my stamps and have been playing around a lot with coloring. Today I'm sharing a couple of cards I've made.
This one is an stamp set from My Favorite Things. I did stamp the image twice, once on Copic X-Press for coloring then again on polka dot paper so I could fussy cut her bathing suit. The Hello Summer sentiment and tab are from the Silhouette Studio and cut with the Cameo.
This is one of my favorite new stamps! It's from Bug a Boo designs and I think is just really fun! I finally used some of the spool of Airmail twine I bought a few years ago, still don't know why I thought I needed a whole spool of that, but oh well! The twine was had a white thread in it, which I didn't think looked right with the darker paper, so I darkened it up a bit by dying it with Antique Linen Distress ink. You can do this simply, and with any ink refill, by adding a few drops of ink to a little water then placing the twine in the mixture. I like to use a small zip lock type plastic bag for this. Mix it around until you have the coverage you want, then take the twine and wring the excess liquid out and let it dry. This same method works for the bias tape ribbon as well.
Hope you enjoyed today's post and enjoy the rest of your day.
Thanks for stopping by!
Lately I have rediscovered my stamps and have been playing around a lot with coloring. Today I'm sharing a couple of cards I've made.
This one is an stamp set from My Favorite Things. I did stamp the image twice, once on Copic X-Press for coloring then again on polka dot paper so I could fussy cut her bathing suit. The Hello Summer sentiment and tab are from the Silhouette Studio and cut with the Cameo.
This is one of my favorite new stamps! It's from Bug a Boo designs and I think is just really fun! I finally used some of the spool of Airmail twine I bought a few years ago, still don't know why I thought I needed a whole spool of that, but oh well! The twine was had a white thread in it, which I didn't think looked right with the darker paper, so I darkened it up a bit by dying it with Antique Linen Distress ink. You can do this simply, and with any ink refill, by adding a few drops of ink to a little water then placing the twine in the mixture. I like to use a small zip lock type plastic bag for this. Mix it around until you have the coverage you want, then take the twine and wring the excess liquid out and let it dry. This same method works for the bias tape ribbon as well.
Hope you enjoyed today's post and enjoy the rest of your day.
Thanks for stopping by!
Saturday, May 4, 2013
Tin is In! Altered Tin with Notecards
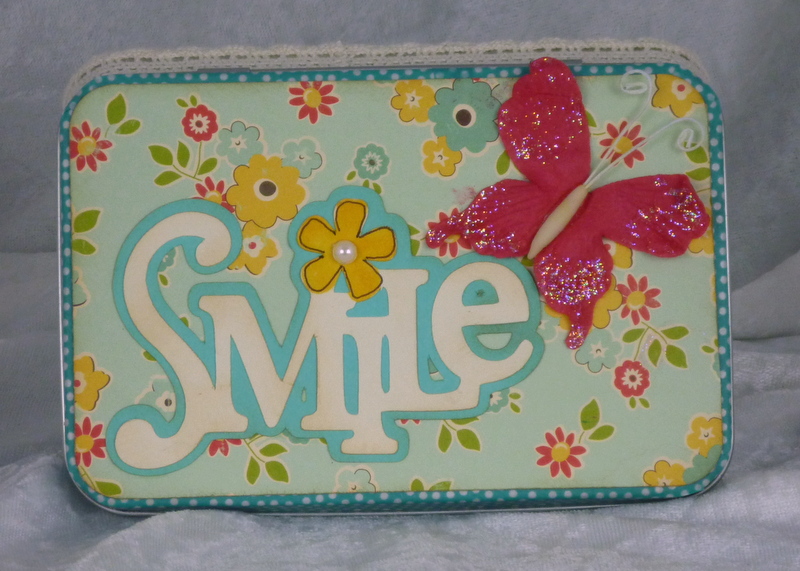
My project today is a different way to use a "nugget" tin. Nugget tins are 5 1/2" X 3 1/2" tins with a clear insert in the lid, which is hinged. A lot of crafty people use them to place Hershey Nugget candies, wrapped in pretty paper, as gifts. I thought it would be fun to alter one and make a matching set of gift cards to fit in it.
To begin, I place 1/2" Washi tape around the top edge of the lid, using the lip on the bottom of the lid as a guide. I like using Washi tape for this, because it is very forgiving and easy to take off and replace if it gets crooked.
Then, to cover the top, I cut a piece of card stock 5 1/4" by 3 3/8" and use a large corner rounder punch to create the rounded corners. It perfectly covers the edges of the Washi tape. I use red tape or Scor Tape for this, but any heavy duty tape will work.This is the top with the cover piece on.
Along the bottom edge of the tin, with the lid closed, I add a 1/2" piece of trim. You can use paper or ribbon. In this case I used a piece of lace trim.
I finish off the outside by adding a die cut and other embellishments to match the cards I made.
I then added a piece of card stock, cut the same size as the top piece, to the inside bottom of the tin.
For the cards, I used the Gypsy and selected one I thought would work well with the shape of the tin. Using real dial size, and sizing height and width seperately, I cut it at 6" X 5" so when folded the finished card would be 3" X 5". ***After I posted this I realized that I made a boo-boo! I made the cards to fit in the tin and forgot that the envelopes would be bigger. So guess what? The envelopes don't fit! If you plan to do this and include envelopes, size them to fit the tin, then size the cards to fit the envelope!***
I hope you enjoyed my project for NSD and get a chance to play along with some of the challenges being offered. For a chance to win this project, two blank tins and a $15 Michael's gift card, please leave a comment on this post. You don't have to be a follower to participate, but please leave me a way to get in touch with you. I will be drawing a winner next Sunday, May 12th.
Here's a list of my crafty friends who are also participating in this fun occasion:
- Around the Block with Scrapalette - 11AM EDT Saturday, May 4, 2013 "Tic Tac Toe Challenge and Blog Prize!
- Col's Creative Corner - 1PM EDT Saturday, May 4, 2013 "Ease on Down the Road" Blog Prize- $15 Michael's Crafts Gift Card!
- Paper, Craft and Scissors - 3PM Saturday, May 4, 2013 "On Pins" theme and Blog Prize - $25 Simon Say Stamp Gift Card!
- Stamp, Cut, Create! blog - 4PM EDT Saturday, May 4, 2013. "Tin Is In" theme and Blog Prize!
- All Scrapped Out - 6PM EDT Saturday, May 4, 2013 "What's It Owl About" theme and Blog Prize!
- The Non-Crafty Crafter - 8PM EDT Saturday, May 4, 2013 "Let's Split- CCR Tutorial" (Learn to create a split letter monogram) and Blog Prize!
- Scrappin With The Bug blog - 10PM EDT Saturday, May 4, 2013 "The Crazy Bs Challenge" and Blog Prize!
- Sara W. Andrews blog - 9AM EDT Sunday, May 5, 2013 "Go Big or Go Home Challenge" and Blog Prize - $20 Hobby Lobby Gift Card!
- Scrappin With the Bug blog - 11AM EDT Sunday, May 5, 2013 "Tropical Sunset Color Challenge" and Blog Prize!
- I Came, I Saw, I Created blog - 6:30PM EDT Sunday, May 5, 2013 "Did-I-MENSION???" Challenge and Blog Prize!
Supplies used: Printed paper from October Afternoon; Cards, Labels, flower and leaf cuts from Cricut CTMH Artiste cartridge; Smile sentiment from Gypsy Wanderings; Lace, pearls, butterfly embellishment from Recollections; Stamps from Hero Arts
Thursday, April 4, 2013
Quick and Easy Card
Hi all! For today's card I went back to the basics, not using any die cut machines. It went together so fast, the longest part of the process was choosing the papers! The design of the card was inspired by the post I saw HERE. Maybe if I start doing more cards like this I will actually get more done!
Thanks for stopping by!
Items used:
Printed Paper: Doodlebug Designs, Flower Box and Take Note
Corner Punch: Marvy
Stamps: Paper Trey Ink, Just the Ticket
Ink: Stampin Up, Tempting Turquoise
Butterfly: Recollections
Ribbon: Offray, 1/4" grosgrain
Thanks for stopping by!
Items used:
Printed Paper: Doodlebug Designs, Flower Box and Take Note
Corner Punch: Marvy
Stamps: Paper Trey Ink, Just the Ticket
Ink: Stampin Up, Tempting Turquoise
Butterfly: Recollections
Ribbon: Offray, 1/4" grosgrain
Friday, January 11, 2013
Teddy Bear's in Oz Blog Hop
Welcome to the Teddy Bears in Oz Blog Hop.We are featuring teddy
bears created from the Cricut Lite cartridge Teddy Bear Parade dressed
as characters from The Wizard of Oz.
You should have arrived here from: Melody Lane Designs
If you are just joining us, start your journey down the yellow brick road at RockinRenee's blog: I Came, I Saw, I Created
The character I am sharing with you today is the Tin Man.
All the cuts were distressed a bit and inked with both Stampin Up Going Gray and Dew Drop Red Brick to make him look a bit weathered and rusty. His heart (from TBOP) was cut twice and layered together with foam tape. The edges were lightly inked with Dew Drop Brilliance Platinum Planet ink. After being glued on his chest, the heart was coated with Glossy Accents. The axe is from Paper Doll Dress Up.
Thank you for joining us today. I hope you enjoyed seeing my take on a Teddy Bear Tin Man and all the other characters as well. The complete file to recreate The Wizard of Oz character bears can be found at the starting blog. Your next visit down the yellow brick road is at A Day in the Life of a Horse Bunny
And here is the complete blog list in case you get lost:
The bear is cut at 4" from gray Coordinations textured card stock. The robot on the Teddy Bears cartridge was used for his suit and it was cut from a metallic paper by Martha Stewart. The robot's wrench hands were cut off, and a rectangle strip was added to the center of his body.Teeny tiny brands from Recollections were placed down the center of the rectangle. They were white, but I filed off the paint then colored them with Dew Drop ink in Red Brick. His collar and bow tie were hand cut and adhered with small pieces of foam tape. A small drop of Silver Chrome Pearl Pen was added to the center of his tie. His nose was also hand cut. His cute funnel hat was created with George and Basic Shapes by welding a triangle, rectangle and letter "C" together.
Thank you for joining us today. I hope you enjoyed seeing my take on a Teddy Bear Tin Man and all the other characters as well. The complete file to recreate The Wizard of Oz character bears can be found at the starting blog. Your next visit down the yellow brick road is at A Day in the Life of a Horse Bunny
And here is the complete blog list in case you get lost:
3. Stamp, Cut, Create!
Subscribe to:
Posts (Atom)
NSD 2015 Challenge: Leave You In Stitches
Hi all and welcome to my blog. It's been a long time since I've posted here, but I'll fill you in on that another time. Today, ...
-
Hi all and welcome to my blog. It's been a long time since I've posted here, but I'll fill you in on that another time. Today, ...
-
Hello and welcome to day two of our Christmas Blog Hop. If you are following the hop you should have arrived here from http://fantabulouslyp...
-
Hi and welcome to the Holly Jolly Blog Hop. This hop will showcase projects from many wonderful crafters just in time for you to get lo...