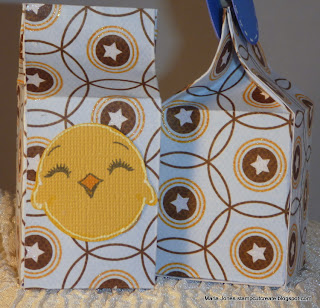
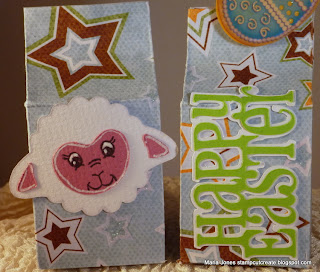
Hello! About a year ago I downloaded a cut file for these cute mini milk cartons after seeing them on the Cricut message board. I got it here . (Of note, last time I checked this file was no longer offered for free but can still be purchased.) I did modify the original file though, adding a door on the bottom that can be opened so that the top would not have to be torn. I am also happy to say that the crate is one that I created using the new Cricut Craft Room. I haven't used the program much, as a matter of fact this is the first and only project I've done in it so far. I am pretty happy with it though.
I think the pink one is my favorite! Most of the images are from the Easter 2010 cartridge. The flower is from Paisley and carrot from Create a Critter. The faces are done with Peachy Keen stamps. I also dug into my stash of old stickers and used some on the eggs. The tags are clipped on with these tiny clothes pins I found in the craft section at Walmart.
Here are some pics of the bottom, opened and closed.
They are filled with Skittles and Runts and are all packaged up and ready to go. Had fun making these and now that I have the top fold down I'm sure I'll be making more.
Thanks for stopping by! Happy Easter!
Maria
Friday, April 22, 2011
Monday, April 18, 2011
Welcome Spring
Hi there! I guess a lot of people are ready for spring right about now. Here in Central Texas you'd think it was summer already, with temps reaching into the 90's today. I am not ready for that yet! Anyway, here's a card I made using the Spring Holiday Cards cartridge. I like the bright spring colors on it.
I used the Gypsy to design the card so the layers could be sized to fit an A2 card base. The images on this cartridge all feature a sentiment, which I decided not to use on this card so I used the hide contour feature on the Gypsy to keep it from cutting. I also did the same with the faces on the flowers. The pink layer was embossed with a Crafts Too embossing folder. The patterned paper is We R Memory Keepers, the Peep stack. On the flower I used MS glitter in Yellow Barite and Lime Green Stickles. The white strip was made with an EK success Wavy Dotted Scallop punch. The sentiment is a stamp from Pink By Design and stamped with SU Melon Mambo ink. I used a piece of bakers twine in Pea Pod to finish it off.
Hope you enjoyed my little bit of spring. Thanks for stopping by!
Maria
Monday, April 11, 2011
Tried something new with my Imagine
I had an idea that I wanted to try with the Imagine and it worked. Basically, I wanted to print a pattern paper and leave a blank area for stamping or printing. Here's how it came out.
To start, I printed the sentiment on a piece of cardstock that was about 6 X 8. Then, using a very thin cardstock, I cut the image to use as a mask. (I just used one that is built into the Imagine. You could use any shape.) This cut was placed over the printed area using repositionable adhesive. I chose a 5 X 7 rectangle that is also a built in cut and filled it with a pattern from the Better Together Imagine Cartridge. After it printed and cut, I removed the mask and was left with the space with my printing on it. I then cut it to the standard 4.25 by 5.5. The masked area was outlined with an MS gold glitter marker. The house image is also from the Better Together Cartridge and is pop dotted to the card base. I added blue baker's twine from Jilly Bean Soup and tied the key charm to it. The charm was silver, but I "painted" it gold with a Copic marker (Y26, Mustard). It is adhered to the card with tiny pop dots.The key also hides a spot where the marker decided to leak leaving a puddle that I had to wipe up. I got most of it, but it did smear some. Of course, it couldn't have happened on the side that the house covers!
I enjoy learning and trying new techniques, especially when they work! I can see this working well for stamped images too. I'll have to try that next.
Thanks for stopping by!
Maria
Saturday, April 2, 2011
Just for You
Hello! I am loving the new Elegant Edges cartridge. It is chalk full of frames and borders and a lot of them are perfect to use with stamps. For this card I used just the shift feature of the cut and cut it in two sizes. I measured the stamp first, then made the cut accordingly. I think it worked perfectly with the stamp.
The printed background paper is from Cosmo Cricket, Garden Variety. The peach floral paper is from an old Provo Craft stack. Large classic and scallop Nestabilities were used for the brown and peach rectangle cuts. The tag was made with the Elegant Edges cartridge using the oblong leaves-s on pg 29 in the handbook. The stamp is from Inkadinkado, Garden Greetings. It was heat embossed with Ranger black embossing powder then colored with Stampin Up markers.
Thanks for stopping by,
Maria
Subscribe to:
Comments (Atom)
NSD 2015 Challenge: Leave You In Stitches
Hi all and welcome to my blog. It's been a long time since I've posted here, but I'll fill you in on that another time. Today, ...

-
Hi all and welcome to my blog. It's been a long time since I've posted here, but I'll fill you in on that another time. Today, ...
-
Hello and welcome to day two of our Christmas Blog Hop. If you are following the hop you should have arrived here from http://fantabulouslyp...
-
Hi and welcome to the Holly Jolly Blog Hop. This hop will showcase projects from many wonderful crafters just in time for you to get lo...


